Emails – Import Emails in Your Victoury Account
General Details
Definition of Terms
- GEA: General Email Account
- PEA: Personal/User Email Account
- TO: Tour Operator
Operators are permitted to receive and save incoming emails from a POP/IMAP email account in Victoury.
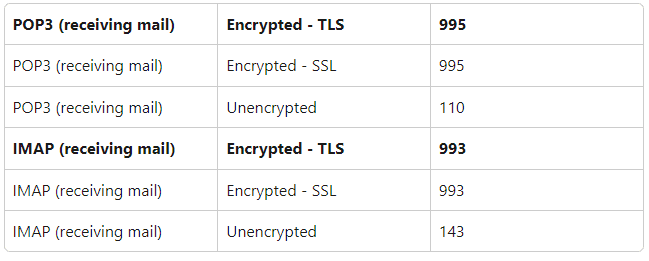
Mail Ports for POP3 and IMAP
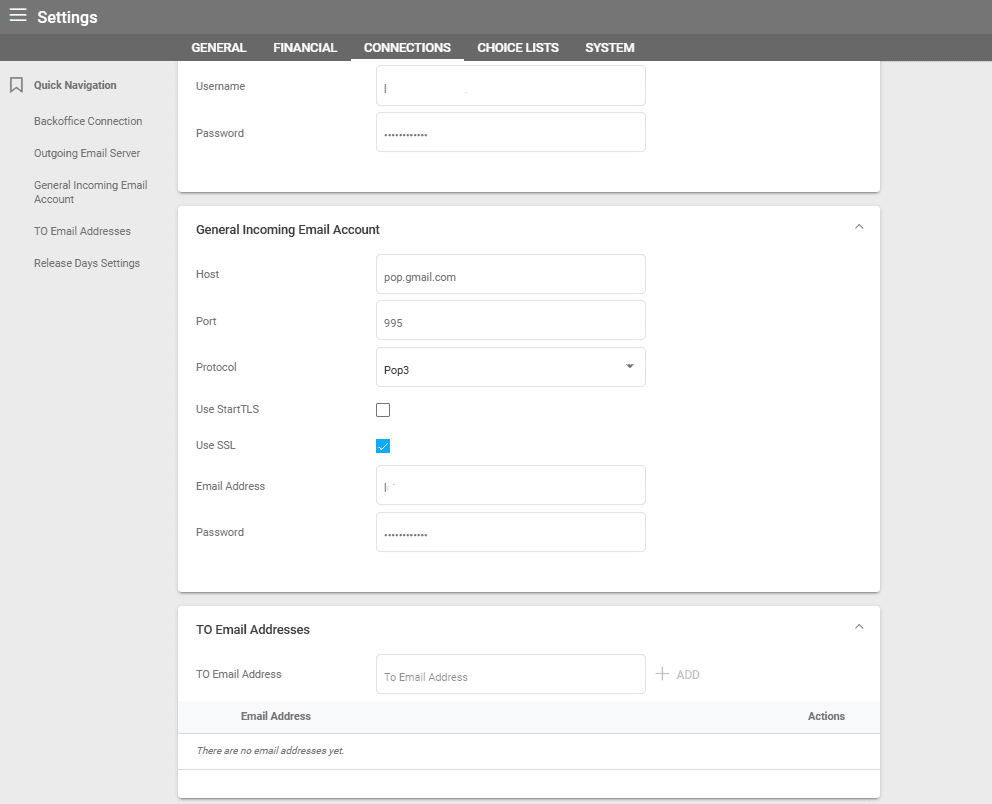
Setting Parameters For GEA: General Incoming Email Account
- Set up parameters for a GEA in the main menu Settings/Connections tab.
- Fill in all “Email Server” fields to support the incoming email of a GEA to be used by all TOs that are allowed to receive emails in Victoury:
- Host
- Port (for custom ports)
- Protocol – Account Type (drop-down: POP or IMAP)
- Use StartTLS
- Use SSL
- Email Address
- Password
Setting Parameters For PEA: Personal/User Email Account
This feature facilitates the import of incoming mails from a personal email account, allowing for the selection of emails to be downloaded.
- Set up parameters for a PEA in Personal Settings of the logged-in user in Victoury, under the Email Settings section.
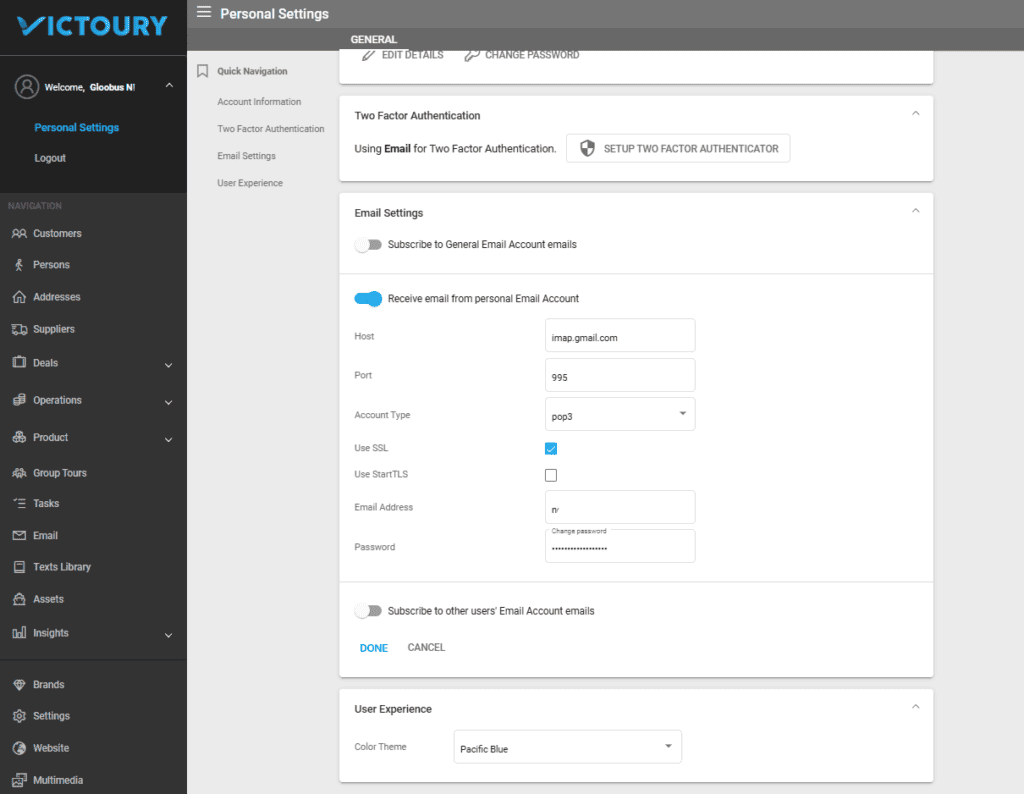
- Fill in all “Email Server” fields to support the incoming email of a PEA, to be used exclusively by the logged-in user in Victoury:
- Host
- Port (for custom ports)
- Account Type (drop-down: POP or IMAP)
- Use StartTLS
- Use SSL
- Email address of the user’s personal email from which emails will be imported
- Password of the user’s personal email from which emails will be imported
- A user may subscribe to a list of GEA, PEA emails, or another user’s PEA emails (the options are enabled/disabled by the toggle button, as seen in the screenshot above).
For other users’ PEA: Other user’s email account, email subscriptions are selected from the dropdown displaying a list of Victoury users:

Before setting up parameters for email import, ensure that your personal email account has been configured to enable POP/IMAP (please see the example below for Gmail POP/IMAP settings):

Receiving Incoming Email
In the main left menu, go to the Email menu point:
Next to the search bar, you’ll find the GET INCOMING EMAIL button and the Re-Check Mail option:


Depending on the user’s personal settings, clicking on GET INCOMING EMAIL will load the GEA and PEA emails list:

In the screenshot above, for Irina Mari’s PEA, an exclamation mark signifies that POP/IMAP is not enabled for that email account, or other security settings might require adjustments.
From the list of loaded emails, select the ones to be downloaded into Victoury’s email list and click the Download button. Confirm the selection to view the download status:

Once the download process is complete, the selected emails will appear in the list as Unread:

Emails can be opened to view their details, download attachments, and mark them as read:

Note:
When downloading emails, the largest unique identifier (UID) of the downloaded emails is saved in the user’s parameters.
Upon checking emails, the system displays messages starting with the last UID.
Example: If the last message received yesterday is downloaded, on the next check, the system will display only the messages received today.
You have the option to “Check email from the beginning,” meaning the system will load all messages, not just those starting with the last UID.

Email Matching
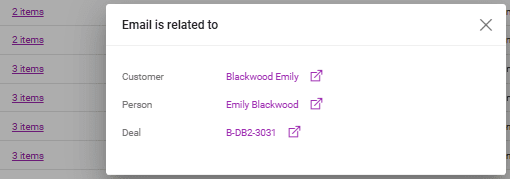
In the Emails list, the Related To column shows who the email is related to.
When importing emails, matching is automatically done for Persons, Customers, and Suppliers.
To view the relations, click on the number of items in the emails list.
Automatic Matching Logic
Customer
- Search for non-temporary persons by the email address “from.”
- If a person is found, link the email with the Person.
- If the person is the main contact of a customer, link the email with the Customer.
- If no customer contact is found, the system searches for a Contact of type “EMAIL” with the value equal to the email of “from” (from Customer details/Contacts with Type=email).

- If a contact type email is found, link the email with the customer.
Supplier
- The same matching logic as for the customer is applied.
Reservation
- All group numbers in the email Subject, e.g., “test mail subject 756 and 324”, are identified.
- For each group of numbers, the system searches for reservations by booking code; booking code = “B-756”, “O-756”, or “L-756”, and so on, across all existing brands.
- If only one record is found, link the email with the reservation.
- If more records are found, no link is made to reservations (users can link manually from the emails list as explained below).
Manual Matching
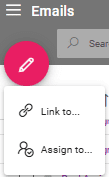
Emails can be manually matched from the Emails list.
Check one or more emails to be matched in the list of emails and use the edit sign for matching. For Type, select the entity to which the email will be matched (Customer, Supplier, Reservation, Sp. Quote/Order, Customer Invoice, Product, or Person):

Once the entity is selected, a new dialog opens with a Search option:
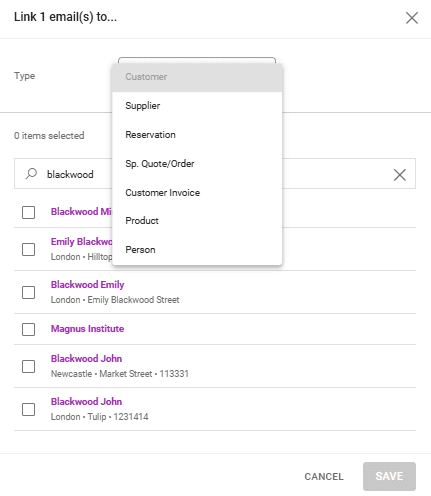
Select from the results the entities and click save.
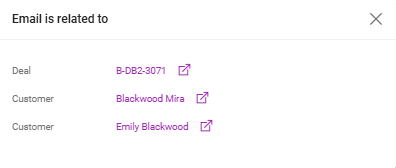
In the Related To column, when clicking on the number of items, all previous selections of entities are displayed along with the already existing relations:
Note:
You may reply to any email using the Reply button available in the Email details, for both Incoming and Outgoing emails!
Click here for details about sending emails from Victoury.